Resource Explorer – Ribbon Menu
The contextual ribbon menu for the Resource Explorer gives you access to all of the functions that allow you to add, remove and modify the Resources used in your project.

Resource Explorer – ribbon menu
GENERAL GROUP
|
NAME |
DESCRIPTION |
|---|---|
|
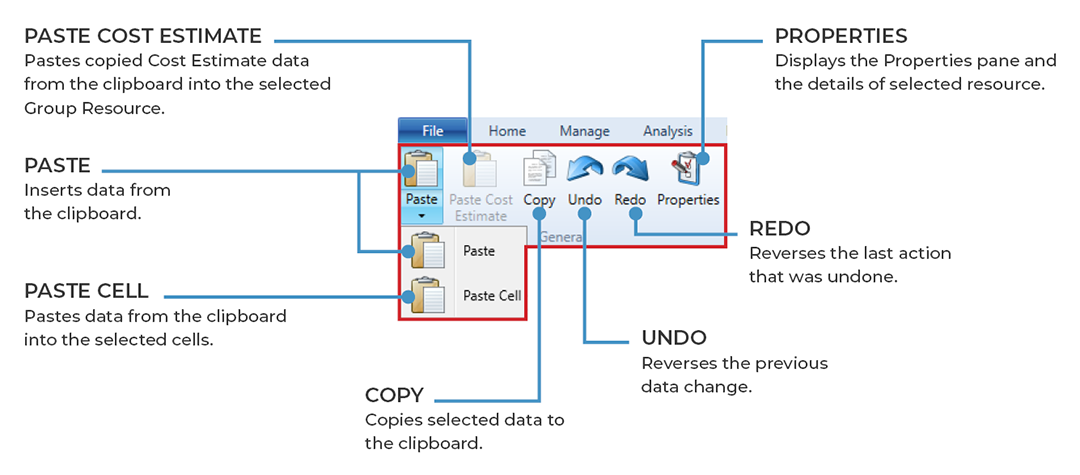
Paste |
Clicking the Paste button will insert the information from the clipboard into the Resource Explorer window. If the data was copied from within Expert Estimation it will be pasted as new resources. When data is copied from an external application, the Paste Special window will be displayed allowing you to map into which columns the copied information is to be pasted. |
|
Paste Cell |
The Paste Cell button will paste information from the clipboard into the selected cells in the Resource Explorer window. The Paste Cell button can be accessed by clicking the arrow underneath the Paste button. |
|
Paste Cost Estimate |
This function is available when the clipboard contains Cost Estimate information and the selected resource or resources are Unfinished Group Resources. When pressed, the Cost Estimate information will be appended into the selected Group Resource(s) Cost Estimates. |
|
Copy |
Clicking the Copy button will copy the selected resource information to the clipboard. This allows the data to be pasted within Expert Estimation or into an external application. |
|
Undo |
Clicking the Undo button reverses the last change made to the data. |
|
Redo |
The Redo button becomes available when an undo action is performed and is used to reverse the undo action. |
|
Properties |
Opens the Properties pane to the right-hand side of the window. This will display the details for the currently selected resource(s) and gives you the ability to edit resource data in bulk. |
UPDATE GROUP
|
NAME |
DESCRIPTION |
|---|---|
|
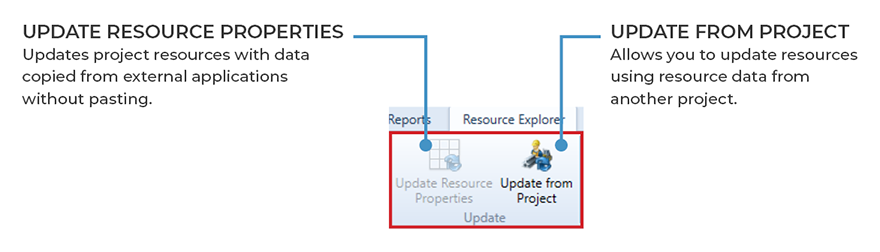
Update Resource Properties |
Clicking the Update Resource Properties button allows you to update project resources with data copied from external applications without pasting. |
|
Update from Project |
The Update from Project button allows you to update the resources in your project with the resource data from another project available on the server. |
EDITING GROUP

|
NAME |
DESCRIPTION |
|---|---|
|
Add Resource |
Using the Add Resource button opens a window that allows you to create a new resource and record some of the resources core properties. |
|
Remove Resource |
Clicking the Remove Resource button permanently deletes the selected resource. You can only remove unused resources. |
|
Remove Unused Resources |
Clicking the Remove Unused Resources button displays a window allowing you to see and delete all resources that are not used within the project. Resources will not be able to be removed if they are currently locked by another user. Unselecting any group resources will also de-select all dependent base resources. |
|
Clone Resource |
Clicking the Clone Resource button opens a window that allows you to quickly copy and rename the selected resource. |
|
Substitute Resource |
Clicking the Substitute Resource button opens a window that allows you to replace an existing resource that is being referenced throughout the project with another existing resource in the Resource Explorer. |
|
Add Category Subfolder |
Clicking the Add Category Subfolder button will add a new category subfolder to the selected Resource Type folder or subfolder. |
|
Remove Category Subfolder |
Resource Category Subfolders can be removed at any time by clicking the Remove Category Subfolder button. You cannot remove the Resource Type folders. Any resources contained within a removed Category Subfolder will be moved to the next available subfolder. |
|
View Cost Estimate |
The View Cost Estimate button opens the Cost Estimate window for the Group Resource that is currently selected. This button is only enabled if a group resource is selected. |
|
View Usage Tree |
Clicking the View Usage Tree button will open a new window showing you where the selected resource is used in the project, the quantity used and the value it contributes. This button will only be available if a single resource is selected. |
|
Calculation Templates |
Clicking the Calculation Templates button will open a new window where you can create a template to perform calculations on a base resource to modify the calculated rate to be used throughout the project. Genesis edition only. |
|
To Uppercase |
The To Uppercase function allows you to change the case of a selected range of Resources so that all alphabetical characters are capitalised. The function relies on at least one Resource selected. Once clicked, a dialogue will appear requiring the name changes to be confirmed before completing the task. This function can be used to assist in making a project’s Resources compliant with an uppercase naming scheme. |
PROPERTIES GROUP
|
NAME |
DESCRIPTION |
|---|---|
|
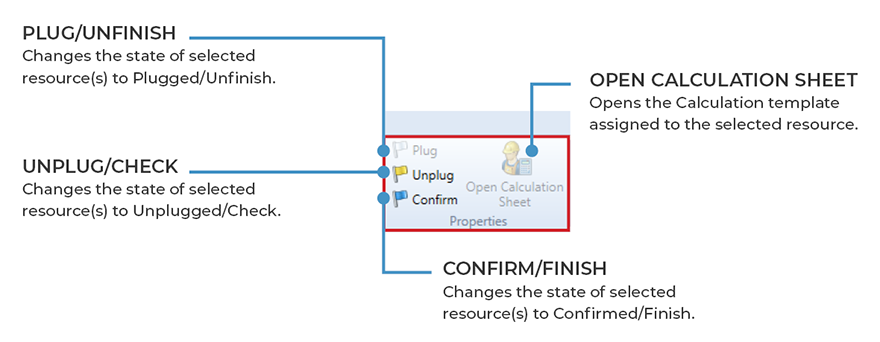
Plug/Unfinish |
The Plug button will change the resource state of a Base Resource to Plugged. A plugged resource state suggests that the rate is an approximation, and is not supported by an actual quotation. If a Group Resource is selected, the Plug button will be changed to Unfinished. |
|
Unplug/Check |
The Unplug button will change the resource state of a Base Resource to Unplugged. An unplugged resource state suggests that the user is confident with the current resource’s rate but a quotation is not available. If a Group Resource is selected, the Plug button will be changed to Check. |
|
Confirm/Finish |
The Confirm button will change the resource state of a Base Resource to Confirmed. A confirmed resource state suggests that a quotation for a resource’s rate has been received. If a Group Resource is selected, the Plug button will be changed to Finish. |
|
Open Calculation Sheet |
The details of a Resource Calculation Sheet can be displayed, populated using the resource’s base rate by clicking the Open Calculation Sheet button. Genesis edition only. |
EXCEL LINKS GROUP

|
NAME |
DESCRIPTION |
|---|---|
|
Spreadsheets |
Clicking the Spreadsheets button will open the Spreadsheets window of Expert Estimation. This will allow you to add spreadsheets to the project that contain named cells with values that you can link to individual resource base / sell rates. Genesis edition only. |
|
Link Base Rate |
Clicking the Link Base Rate button opens a window that allows you to select a spreadsheet and named cell that contains a value that will be linked to the selected resource. Once a base rate is linked to a spreadsheet the value cannot be modified manually from within the Resource Explorer. Genesis edition only. |
|
Link Sell Rate |
Clicking the Link Sell Rate button opens a window that allows you to select a spreadsheet and named cell that contains a value that will be linked to the selected resource. Once a sell rate is linked to a spreadsheet the value cannot be modified manually from within the Resource Explorer. Genesis edition only. |
|
Unlink |
Clicking the Unlink button will remove the link between the selected resource's base / sell rate and the named cell in the spreadsheet. If both the Base and Sell Rate are linked to spreadsheets, a dialogue window will appear asking if you want to: Unlink the Base Rate, Unlink the Sell Rate or Unlock both rates. Once a link has been removed, the rate can be manually edited within the Resource Explorer. Genesis edition only. |
|
Sync Values |
If a spreadsheet has been modified or overwritten, the Sync Values button will allow you to update the Resources rates with the updated Spreadsheet values. A window will be displayed if any values are out of sync, showing you the changes and allow you to select which values should be updated. Genesis edition only. |
DISPLAY GROUP
|
NAME |
DESCRIPTION |
|---|---|
|
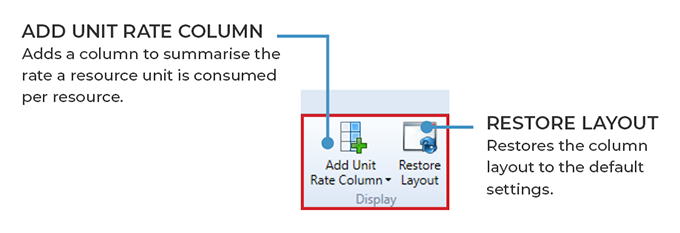
Add Unit Rate Column |
The Add Unit Rate Column button opens a sub-menu that allows you to add unit rate summary columns for selected units to the Resource Explorer window. This displays a usage rate of the selected unit for each resource. Genesis and Express editions only. |
|
Restore Layout |
If columns have been removed, adjusted or relocated, clicking the Restore Layout button will restore columns to their default layout. |
GRID GROUP

|
NAME |
DESCRIPTION |
|---|---|
|
Filter Editor |
Opens the Filter Editor to allow users to modify the contents of the grid so that only items that match the specific criteria set will be displayed. |
|
Column Chooser |
Clicking the Column Chooser button will open a dialogue box that will allow users to add or remove columns from the grid. |
|
Search |
Clicking the Search function will display a field in the top right-hand corner of the grid, that will allow users to search the current window for the text entered. |
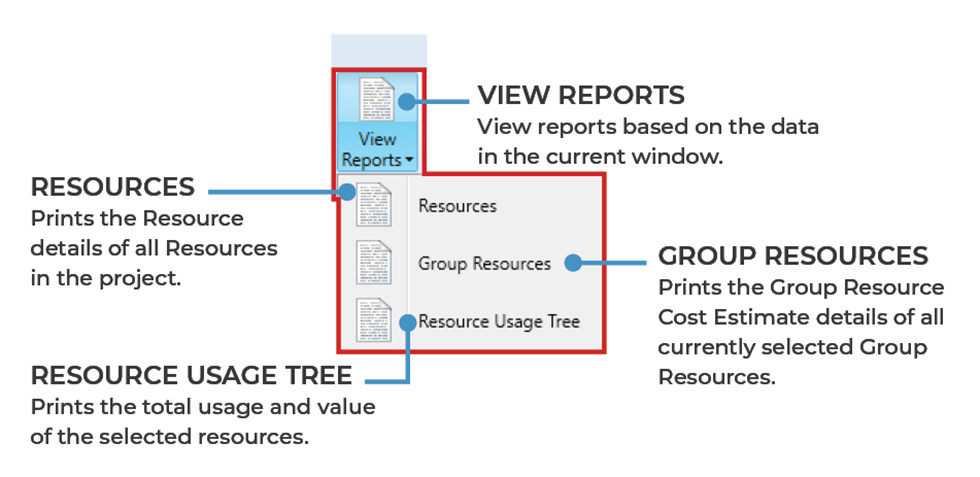
REPORTS GROUP
|
name |
description |
|---|---|
|
Resources |
Prints the details of the selected Resources. |
|
Group Resources |
Prints the details of the selected Group Resources and their Cost Estimate details. |
|
Resource Usage Tree |
Prints the total usage and value of the selected resources in the project. |
HELP GROUP

|
NAME |
DESCRIPTION |
|---|---|
|
SavvyHelp |
Selecting the SavvyHelp button will open the SavvyHelp pane on the right of the window. This will display useful information about the window as well as details for the columns available. |