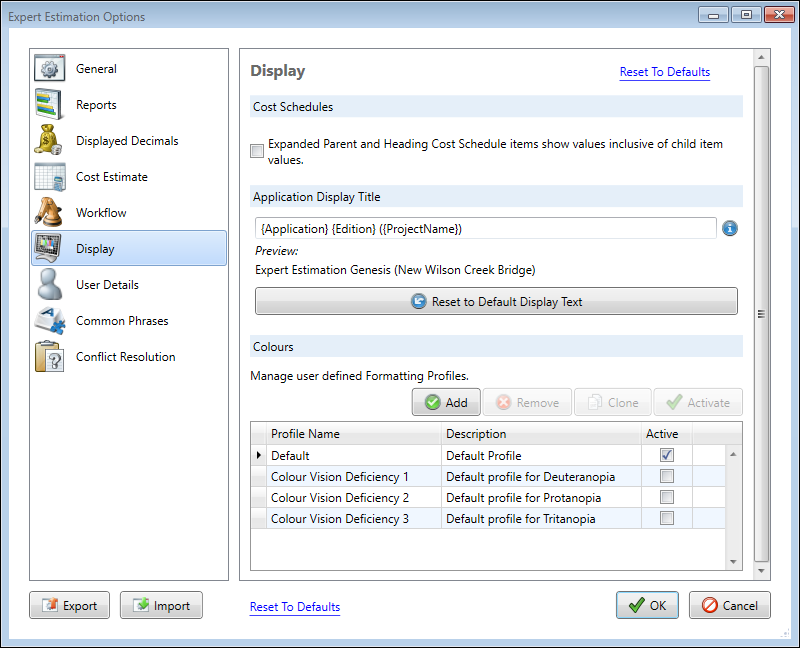
Options – Display
Expert Estimation has many ways to assist in showing a user the information they need to see. In some cases, the way Expert Estimation displays the information to users can be adjusted based on a range of Project Properties and User Options.
The Display page in Expert Estimation Options provides user-specific settings to adjust how information is presented across the application. The settings shown will apply to all projects accessed on the current machine. However, some settings can be overridden on a per-project basis.
Note: In the top right hand corner of this window there is a Reset To Default option which will revert any changes in this window to their default values, this can only be undone by pressing Cancel or re-importing a copy of the desired User Settings through the import button.
Options window – Display window
COST SCHEDULES
This section relates to the display option available to a user when viewing the Cost Schedule windows. Unless explicitly detailed, the below option applies for both the Direct and Overhead Cost Schedule windows.
|
NAME |
DESCRIPTION |
|---|---|
|
Expanded Parent and Heading Cost Schedule items show values inclusive of child item values |
This option allows for an expanded ‘Parent’ Cost Schedule Item to always show a combined value (inclusive of all ‘Child’ item values) regardless of whether it is in an expanded or collapsed state. This can assist users that do not need to see individual item values, and instead want a clear understanding of a contributing item’s overall value, irrespective of whether the child items can be seen or not. |
APPLICATION DISPLAY TITLE
This section allows you to customise the information displayed in the title bar of the application.
The text box available provides you with an area to enter the custom text or predefined variables that will be displayed.
Note: The { } brackets surrounding each variable are necessary and work as delimiters between the variables and normal text to be shown.
|
variable |
DESCRIPTION |
|---|---|
|
{ApplicationVersion} |
The current version of the current Server component. |
|
{TenderNumber} |
The tender number of the currently opened project. This can be modified within the Project Properties. |
|
{ProjectReferenceCode} |
The Project Reference Code of the open project. If no project is open, this value will be blank. This can be modified within the Project Properties. |
|
{Application} |
The name of the application – Expert Estimation |
|
{Client} |
The client information of the opened project. This can be modified within the Project Properties. |
|
{ProjectName} |
The name of the currently opened project. This can be modified within the Project Properties window. |
|
{ServerName} |
The name of the server you are connected to. This can be modified by removing and re-adding the server from the Select Server window. |
|
{Edition} |
The current product edition that is being used. (This will display either Express, Excelerate or Genesis) |
|
{ServerURI} |
The URI address of the server you are connected to. |
Any combination of these variables will populate the preview section with the converted title. You can also hover your mouse over the information icon to see a full list of the available variables and preview information.
If you wish to revert the title to the default value press ![]()
COLOURS
This section allows you to manage and activate user-defined colour profiles. Within each profile, you are able to configure background and or foreground colours for a range of different elements across a project.
There are four profiles pre-loaded into Expert Estimation. These are the default Expert Estimation colour style, a Deuteranopia style, a Protanopia style and a Tritanopia style. Any of the pre-loaded styles can be modified at any time.
Additional profiles can be created by pressing the Add or Clone buttons. To change the current profile being used, select the desired profile and press the Activate button. The currently active profile will display a tick in the Active column.
Note: While these colour options are set per user, they can be overridden on a per-project basis from the Project Properties – Display window.
While a profile is selected, an additional section will be displayed, highlighting the different elements and colours settings that are currently set for that profile, these can be changed by clicking on the dropdown list in the Colour column.
From the colour dropdown list you have the following options:
- You can either specify a colour from the predefined colour wheel.
- Select More Colours to select the exact colour you are after based on the RGB value.
- Select the default colour of that element based on the current profile selected.
- Specify no colour for this element (this is only applicable for Highlight Elements).
