Enabling And Accessing The API
Using the API (Application Programming Interface), Expert Estimation has the capability to run customised queries and extract various forms of statistical information from multiple projects at once.
Note: The API is designed for an external application to access data from the database. It is not intended as a way to externally modify the Expert Estimation data.
ENABLING OR DISABLING THE API
New installations of Expert Estimation version 1.26.1.20662 and later will have the API enabled by default and can be accessed via the API Documentation portal or third party tools. Existing installations that have the configuration line present in the Expert Estimation Server's configuration file when an upgrade is performed will respect the current setting.
The API can be explicitly enabled in earlier versions of Expert Estimation, or disabled if access is not required by following the steps below. This requires the Expert Estimation Server service to be stopped.
Note: Before stopping the Expert Estimation Server, please ensure there are no users currently connected to the server performing work.
- Open the Local Services window of the machine that has the Server component of Expert Estimation installed. To open the Local Services window, open the Run command (Windows key + R) and type services.msc, then click OK.
- In the Services list find the service listed as "Expert Estimation Server", right-click and select Stop.
- Open a text editor, such as Notepad++, ensuring you use the Run as administrator option.
- Browse to C:\ProgramData\Pronamics\Expert Estimation\Server\Server.<INSERT VERSION NUMBER HERE>
Alternatively, it is possible to use %EESERVER% in the address bar, to quickly browse to the Server folder of the installed version.
Note: The system variable %EESERVER% will only function when Expert Estimation was installed from the Pronamics Product Selector. - Find and open the file, Pronamics.ExpertEstimation.Server.exe.config.
-
To enable the API for earlier versions, enter the below code snippet into the <appSettings> section:
<add key="Nancy.APIEnabled" value="true" />
Note: Legacy versions of Expert Estimation may have this line included by default. In these circumstances, change the value from "false" to "true".
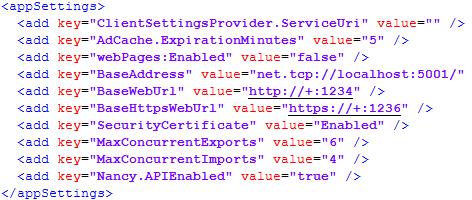
Expert Estimation - Server Configuration File with API Enabled
If the code snippet is already present in the configuration file, change value="false" to value="true". - To disable the API, complete the steps above and ensure the code snippet reads as:
<add key="Nancy.APIEnabled" value="false" /> - Save and close the text editor.
- In the Local Services window from Step 1, find the service listed as “Expert Estimation Server”, right-click and select Start.
The Expert Estimation Server API will now be enabled or disbaled, depending on the desired outcome.
ACCESSING THE API
The Expert Estimation API documentation portal can now be accessed through a web browser such as Google Chrome or Firefox. To access the Expert Estimation API Documentation:
- Open the web browser of your choice.
- When the browser opens, navigate to http://localhost
:1234/SwaggerUI/
Note: Substitute localhost
If you are accessing the server locally, this would be http://localhost:1234/SwaggerUI/ however if you are accessing a remote server with the Domain Name “GenesisServer” then you would enter http://GenesisServer:1234/SwaggerUI/
Note: The trailing forward slash is required to access SwaggerUI.
This will bring you to the Expert Estimation API Documentation portal where the available parameters are outlined and queries can be run.
Note: If the option in the configuration portal Require API Keys for all API Queries is enabled, the associated User Group will need to have an API Key generated to access the API.
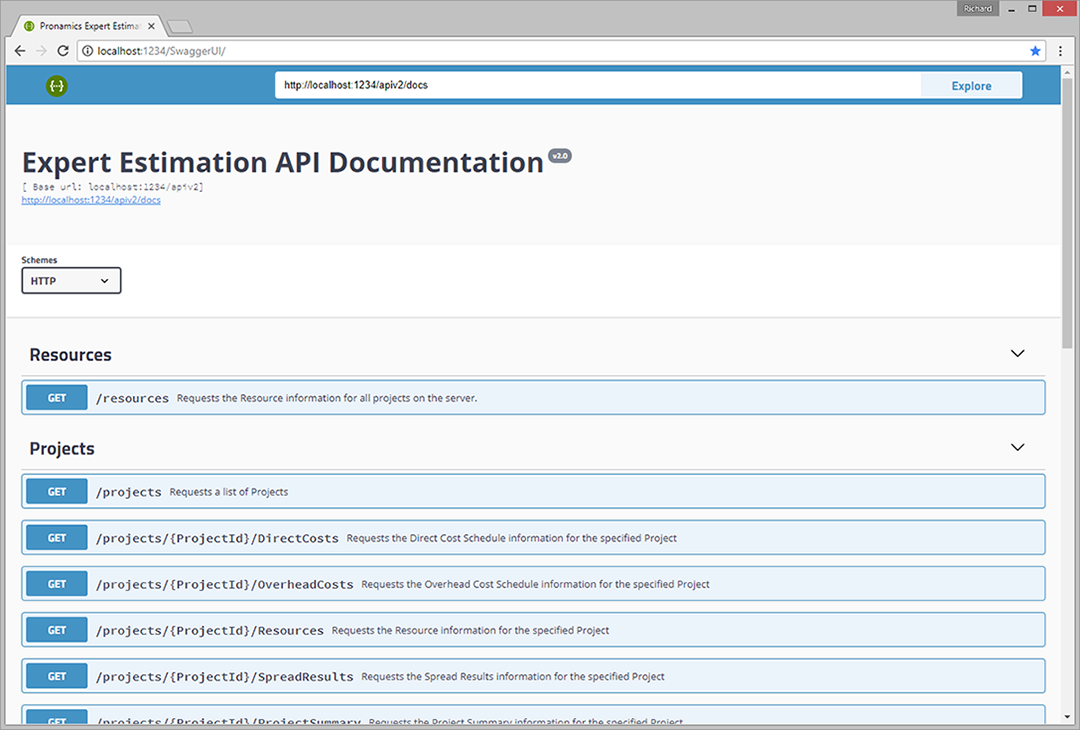
Expert Estimation’s API Documentation portal accessed through Google Chrome
API KEYS
API Keys are a security measure that is required to access data from the Expert Estimation server using the API service with or without security enabled.
API Keys are linked to User Groups in the Security Configuration Portal, and can be added under the Groups tab.
USING THE API
The Expert Estimation API Documentation landing page allows for queries to be run through the API to the server database.
Note: Performing API queries will now require valid API Keys to access the database and project information contained within.
To gather information from a particular project the Project ID will need to be referenced. This ID can be obtained by:
- Expanding the Project section, by selecting the drop-down arrow on the right-hand side of the collapsed section.
- Select the GET button from the /projects field. This will list the available parameters that can be set.
- Click the Try it out button to enable editing of the parameter fields.
- Enter a valid API Key into the X-Api-Key field. This is a required field for the API calls to process successfully.
- In the relevant fields, enter in project information that you wish to gather. Each field has a description of the information the filter can use. Multiple filters can be used simultaneously.
- Once the project information has been entered, select the format for the information to be returned by clicking on the Response content type field and selecting the desired format from the drop-down. The API will return the query in either XML or JSON format.
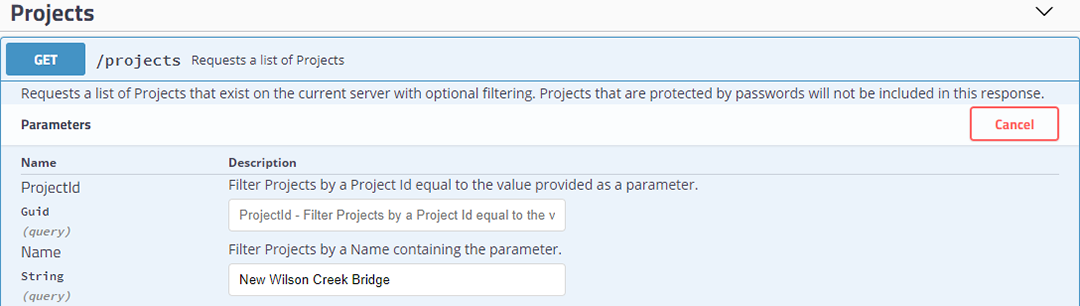
API Get parameter
- When the format of the information to be returned has been set, click the Execute button.
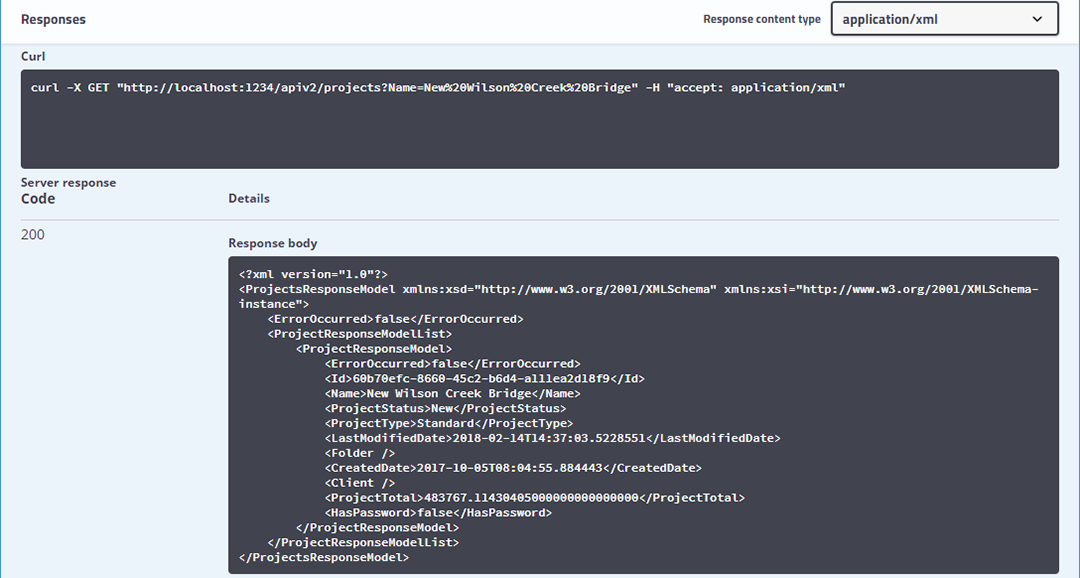
API Response
- The corresponding results from the API will be displayed under the Responses section structured in the selected format, as seen in the above image.
When a response is returned, the API Documentation creates a web endpoint URL, under the Curl subsection. This URL can be referenced by an external application to collect the results generated and present them in a structure defined by the external application.