Central Server Install
Installing the Expert Estimation Server centrally provides a number of benefits for teams:
- Centralised information.
- Easily managed data backup and restoration.
- Collaboration and information sharing.

SERVER INSTALLATION PREREQUISITES
- A reliable and fast Internet connection.
- A valid licence key.
- The IP or hostname of the machine where the Server component will be installed (may require technical assistance).
PROCESS
SERVER COMPONENT INSTALLATION
To install the Server component on the server machine, proceed with the following steps:
- Download the Pronamics Product Selector from https://download.pronamics.com.au/ProductSelector
- Once downloaded, locate the file on your machine and double-click to run the installer. This will guide you easily through a process for installing, with a new shortcut being added to your Desktop.
- Double-click on the Pronamics Product Selector icon. This will open the Pronamics Product Selector.
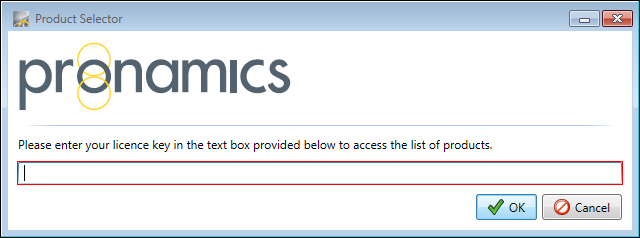
- As this is the first time you have run the Product Selector, you will be prompted to enter your licence key. Type or paste it in and click OK.
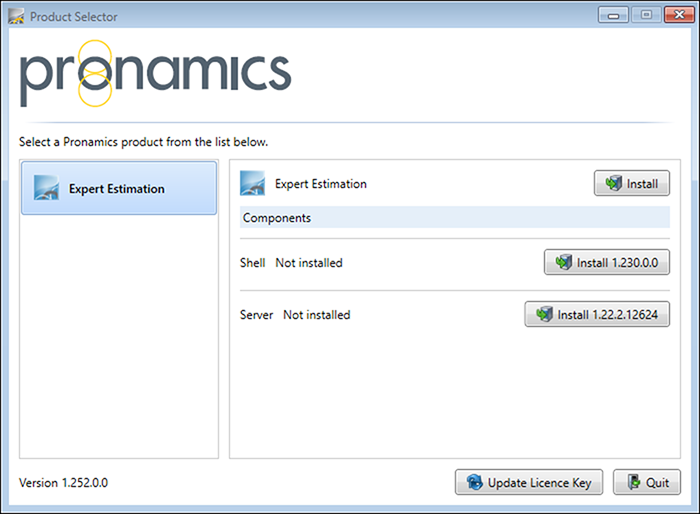
- After validating the key, the Product Selector will list the products you are able to install and their components.
- Click on the Install <version #> button to the right of the label for the Server. The version number is subject to change and is dependent on your licence key.
- Once the Server component is installed on the server machine, take note of the machine’s name or IP address and then follow the steps below to set up the Client machines.
SHELL COMPONENT INSTALLATION
To install the Shell component on the client machines and complete the initial set up for Expert Estimation, proceed with the following steps:
- Download the Pronamics Product Selector from https://download.pronamics.com.au/ProductSelector
- Once downloaded, locate the file on your machine and double-click to run the installer. This will guide you easily through a process for installing, with a new shortcut being added to your Desktop.
- Double-click on the Pronamics Product Selector icon. This will open the Pronamics Product Selector.
- As this is the first time you have run the Product Selector, you will be prompted to enter your licence key. Type or paste it in and click OK.
After validating the key, the Product Selector will list the products you are able to install and their components. - Click the Install <version #> button to the right of the label for Shell. The version number is subject to change and is dependent on your licence key.
- The application will begin downloading and installing. You will be prompted when this has been completed.
- Upon completing the installation, a new Desktop Icon will appear for Expert Estimation.
- Double-click the Icon to open Expert Estimation.
- The Server Selection window will appear with a selection labelled “localhost”. Click the green plus Add Server button to include the machine that the server was installed to in the Server Component Installation section above.

- In the Server Name field enter a descriptive label for the machine you are connecting to (eg. Project Server).
- In the Server URI field enter the IP address or hostname of the server you wish to connect to.
- Click the Save button. The new connection will be selected in the list. A green circle with a tick will appear to the left of the Server Name, indicating that the server is now ready for connection.
- Click the Connect button to start opening the Client application.
- You will need to read and agree to the End User Licence Agreement (EULA).
- When opened for the first time, you will be asked to enter your licence key again and click validate.
- Once you have done this and selected your Product Edition click Select.
You have now successfully connected to your central Expert Estimation Server from a separate workstation. To get other workstations up and running you will need to repeat the Shell Component Installation section for every workstation you wish to give access to the software.